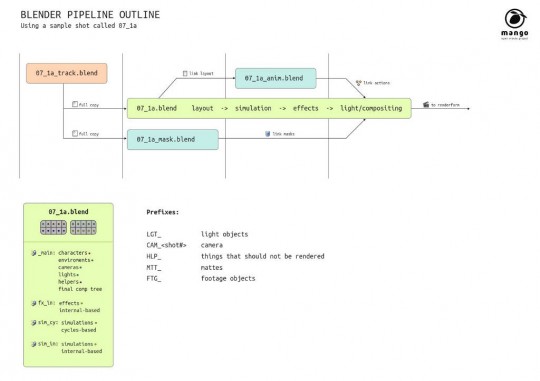
In this brief post I will illustrate an important part of our pipeline: the shot creation and development. The process described happens for every shot in the movie and appears slightly simplified (footage input and simulations are not taken into account). Here we have a picture of the process, plus a few notes about how production files are organized (on which layers objects should be placed on, and some naming conventions).

Everything starts with a blendfile where the shot is tracked and solved (the track file). This file is then duplicated and used as a starting point for keying and masking (masking file) and also for the main file, where layout, simulations, effects, light and compositing will be used. As soon as the main file is created, all the required libraries are linked in from environment and charachter files, so that the tracked camera can be placed in the right place in the scene. Once that the layout is approved it is possible to proceed with basic lighting and compositing, by creating the proper renderlayer setup. If simulation or effects like gun blasts, explosions or haze are needed, they are added to the same file, but in separate scenes. This system allows us even to use both blender internal render engine and cycles at the same time!
Given the size of our team it makes sense to keep workflow steps as compact as possible, since we can cohordinate on which shot everyone is working. A separate file for animation is created only when needed and it contains mostly liked libraries or objects, such as the camera, from the main file. At the same time, the main file links in masks and actions, so that they can be used in the compositor and on rig proxies.
This system allows a good degree of freedom and flexibility and its proving itself quite reliable.
Other posts about how we deal with footage, simulations and editing will come in the future:)


And this all in one free program. Awesome.
Great to see the pipeline and organization of the project. Two questions:
1. On the yellow section in the lower left hand corner: I gather that each “##_#a.blend” file contains four scenes, and that the final comp is in the “_main” scene (and of course is not on a renderlayer, so has no dot.) Still, the colors of the dots in the .jpg are difficult to tell apart. Which layers are environments/lights/cameras?
2. (stupid question) What are footage objects?
I guess footage objects are 3d plane with the filmed video has a texture to be integrated in the 3d scene…
Correct. In most cases we use the MovieClip function in the Compositor, but for instances where we have to animate footage in the 3D scene (e.g. Thom hanging on a rope in the church environment) we have to use actual geometry, these have the prefix FTG_
Awesome. Pipeline is definitely something that can be difficult to work out, especially for novices like me.
Looking forward to see how offline then online editing is performed. As all this is dependant on timing media to the correct start frame. I wonder how the frame counts and frame starts are carried over to the compositor or 3D view background?
How are you guys coping with scenes having several keyed elements? I’m working off the latest tomato build for mac on graphicall (47342) and it’s a bit crashy with 4 1080p keyed clips in the same comp. The mac is pretty beefy, core i7 quad with 16GB ram…
They have workstations.
…well, I’m not exactly using my smartphone to render this thing…
the shots are always pre-keyed. then the cleaned footage (with alpha) is brought into the composites.
That makes sense, thanks Andy. Will definitely start splitting parts of my projects up into separate blend files. Great post, very keen to start seeing some finished shots.
Also, thanks for sharing your pipeline, seems like a great way to tackle it, love how linking works in Blender, top notch.
Interesting post !
Is there a reason to have the track file copied ? Is it not possible to link to the track results as well ?
That would mean, if you have to do the tracking again ( for whatever reason) you have to redo quite some work already done on the copied versions.
For final rendering will you be using you own farm or renderfarm.fi?
We’ll be using the Blender Institute farm. Currently using the Justa Cluster and the Dell farm as well as the local computers in the office. The latter also can be used to render using the GPU which sometimes gives speedups up to 4x…
It’d be cool to have one shot in the final film rendered with renderfarm.fi
I also thimk it’s the most productive workflow.
But I wonder : since one goal of this open moovie is to improve depsgraph, im not sure it will really shows the progress amasing developper are making : for instance it’s not possible today sharing node without importing / linking the all scene ! And that is said to be changed soon by andding proper RNA. This workflow, part of an open moovie that attempt to show that blender is cool for studio movie, arent so prooving anything about this point.
I m fully advise that segmenting the all film into tons of file are inproductive and quite impossible, but what about a single shot that could be done as if you were ten times more.
Its would be moreover a good ad for next movie/project (sorry i cant recall the name) that, as Ton says, would be collaborative and use a lot more people all over the world.
Last but not least, you can ask the community to do this scene : there are a lot of people that cant apply for months but who are very competent, even pro in 3d or matchmooving. I think at François Grassard, called “Coyhot” who send tracking tree node to Sergey and Ton and both enjoy.
What do you team think about ?
Hey Mango team, thanx for the informative post. There’s a lot I need to understand regarding this but the question that comes to mind is how are you gonna use masks in the sequencer? Or are there no plans for this sort of work?
Hey! As Andy said, we are preparing pre-keyed and masked shot in the movie clip editor. At the moment it is not possible to do great masking in the compositor.
Hi Francesco, thanx for the response! :)
It would be good to know how to do masking proper in the sequencer. I understand how the movie clip editor is used but I’m just wondering if/how masking can be done in the sequencer.
It’d be wrong to critique the pipeline as it stands, as clearly this is just part of the overall picture – I do look forward to seeing the whole thing though, and I am hoping that you guys will get some really good ideas on where to take Blender in regards to making efficient pipelines possible between multiple users.
How are you guys tying Blender into asset management / tracking, is it all manual at the moment?
Mostly manual, since we don’t have an insane amount of assets, and partly with python scripts/addons.
Hi,I was interested if you guys can also upload a sheet with all the cash that is going out, from the budget and cash going into the budget. And would be great to see it. So maybe will help anyone see how to manage with movie money.. And will let us see how money so far the short had cost! Looking foward!
I guess, 60% goes in beer and coffee, 30% to the producer , 7% for renting camera/lighting/props ect , 2.5% to the artist/actor (some do both to make more money) and 0.5 % to the sound design, like a classic movie budget
So you are using BI and not Cycles for smoke?
We use BI, since at the moment Cycles does not support volumetrics.
No Mango-Update today?:-(
If they aren’t any update it would surely be one or many extraordinary things tomorrow : Brecht has to (as Ton in developer Meeting says) speak about cycles improvements and perhaps Ton about Coyhot keying node-tree. For the other thinks I cant guess be it would surely be super cool.
Just be patient.
are there any news about ram cache for the node compositor¿?