The modelling for the dome environment is proceding steadily, here’s a test render (from last week, actually) :
Light design and compositing are totally temp, the shaders will need lots more testing and you can easily spot some meshes that are still at previz-level-of-detail.

This week I was more focused on modelling details so that for the shooting (or right after it) shots can be framed and setup with a good idea of the final shapes and silhouettes (see renders at the end of post).
The 2 screenshots below show a typical sci-fi-industrial-metal environment prop (it’s a module of the base ring of the dome). the more ‘organic’ objects (old buildings, wood and stone) are proving more complicate and require individual solutions … but big misc machinery with an industrial-sci-fi look ? Those can be made reliably with almost always the same modelling and shading tecniques.
This uses the batchbake and 3-steps stencil node I’ve posted about earlier, and very soon I’ll be able to check with the others (devs and artists) how well this is working and what tweaks it might require (but it should prove efficient for memory in large scenes and flexible to tweak for specific shots or depending on the rendering needs ).
As you can imagine, it would make sense to think of modelling and texturing , then care about shaders and materials later, when the lighting is being done … But, for these environment pieces, you can’t really expect to have custom unwrapped, non-tiling UVs for everything and col/spec/bump maps for every indivudual object (nor it is technically convenient for memory and texture resolution), so ‘texturing’ is more about making tileable, reusable textures and set them up in materials that can be later tweak to respond to light as needed.
Of course some custom painted maps are necessary , but -combined with tileables- is often enough (or better) to use vertex color for AO and base color , and low-res bitmap masks (i.e. to mix broken plaster and bricks).


Something that is proving very useful is kits of standard objects like : metal beams, broken concrete pillars, wood planks.
Once they’re setup, each piece can be grouped , linked into scenes and reused 1000 of times , but still be editable in a library blendfile where shading and modelling can be easily tweaked or redone completely.
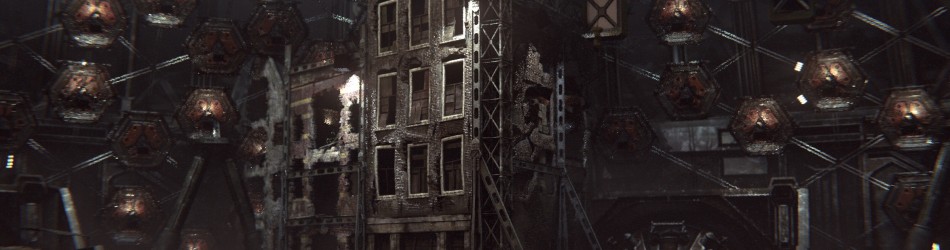
And -below- some more up-to-date images still some big pieces needing detail (mostly the church) but what’s going to be in important areas has enough silhouette detail for framing shots: the house in front of the church with broken bricks , the computers behind the scientists boats and the wires and broken walls for the east facades:


is there a high-res. version of the first image? That would be nice :)
Woops, sorry, images weren’t linking to fullsize , you can click on them now. :)
Thanks! Looks great :)
No cares you’re first! ;)
anyway! great work guys!! looks amazing!
Agreed on both points!
Whoooow this is not even a slid step behinde the Quad Bot :D
how many:
Objects;
Vertecys
and whats you regular Image mapp sitzt
and did you splitt the set to peases and Use witch you Need Or will you link the hole set to the szene
Hi,
Thx.
The dome is currently around 6,5 million polies at rendertime.
The scene file is made of a dozen scenes each containing a piece (bridge, roads , shell , canal bed , etc..) and each scene contains tens to thousands of objects (like the greeble / broken pavement pieces)
For maps i start by default at 2k (2048×2048) and resize to 1k later if necessary , i often use 4k for tileable, reusable textures.
But at some point , when all the maps are there, we’ll prob. resize lots of dirtmaps -from the batchbake script- to smaller sizes like 512.
Right now the dome is rendering in one pass , and should remain that way , with separate rendering for characters and maybe close-up props (just a guess though , i’m not setting up the compositing and pipeline )
For linking , i’ve just finished refactoring the groups so it now works with Francesco and Olivier’s Powerlib script : meaning you link the dome into shot files as a single group and you can then hide pieces and change detail level.
It really looks great.
And the Oscar goes to…..
Looks good.
Is the dome inspired from Paul Debevec’s light stage?
I would say: “Final fantasy, the spirits within” :)
Practical lighting is good lighting. :D
Cycles needs to get a new, good prime lens; that chromatic aberration…!
Actually, I think the chromatic aberration is added in compositing. Might be wrong, but I havent encountered it when using Cycles.
Woo, vertex colours! I have a patch for baking to vertex colours, which I find very useful in my own work:
http://projects.blender.org/tracker/index.php?func=detail&aid=29035&group_id=9&atid=127
I’m currently updating this to work with bmesh. If you think it would be useful, it would be great if you could mention it to Sergey or Brecht ;)
Not specifically related to this post, but have I told you guys that I’m addicted to this blog? I think I check it more often then my mail, and that’s saying something.
I think it all looses proportions, everything seems to be a small model of a real-size structure, for instance wall breaks seem to be cut in a cardbox therefore they look unnatural, cables are too thick comparing to buildings, church looks like a primitive toy-like recreation of something real. Moreover I’m really interested how Cycles will handle such interiors, I know these are test renders but the amount of noise and fireflies is quite large.
Just wait for the angles!
This is obviously shot in a ‘show as much as possible’-angle,
just wait for realistic ones and the size will definetly get clear.
Viewing a city from above also gives you the feel like it was miniature, doesnt it? ;)
thanks, as you say these angles are just showing as much as possible.
But also the church facade as stated in the post needs quite a bit more modelling (although, since it could take lots of work , how much more detail it will get depends partially on the final framing of shots )
As for the facades, the combination of knife tool + inset is really a nice quick way to chip off pieces of buildings (concrete beams, bricks,etc..) .. but it then needs more : in the 1st image the tecnique is the same but then single bricks are added along those cracks to refine them (another situation is the house in front of the church , which is much more close-up , and there i’m using way more single brick meshes (about 30% of total , while for these facades a 1% of real bricks should be enough to break silouhettes of the holes)
Good point about the cables ..there’s no realworld counterpart for such a thing to say they’re too big, but still making them bundles or smaller cables could be more convincing.
And also about scale, it makes me think i should take care for parts of the dome where there’s no buildings close-by to have stuff like gangways and ladders to give a human scale reference.