During these weeks before the filming and the actual work on the shots starts we are doing several tests to check out the production tools. One of them is obviously Cycles. In this particular test we wanted to see how far we can go with the integration of the robot hand in a shot.
Of course it is obvious that the hand is fake, after all it’s a robot hand, so we also put in objects that could in theory be actually standing on the table. We went for a mirror ball (because there was an actual mirror ball in the scene, so, easy to compare) and a plastic toy.
To create believable light and reflections we took a RAW image of the mirror ball and mapped it to the environment (anyone knows a tool to convert CR2 images to EXR, other than Aperture?). Cycles node-shaders allowed to adjust the amount of reflection and lighting influence of the environment material, as well as tint and contrast of the reflections.
The mirror ball rendered very fast and works quite well, even though not perfect at all. Integrating the little orange dragon also worked pretty straight-forward in terms of light.

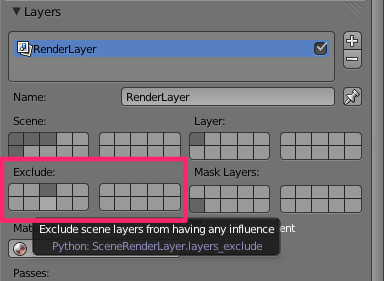
The tricky thing however was the shadow. We wanted to create an extra challenge for us, so we put the little dragon both in sun and in shadow. It is always a challenge to merge a CG shadow with a real one, not only because you have to get the same intensity and tint, but also because of the transition area of CG and real shadow. During the work we realized that it is impossible to separate shadows from different objects from each other in Cycles. In Blender Internal it would have been possible to assign the shadow casting objects and the shadow receiving objects to different render layers, thereby controlling what object receives which shadow. But Cycles works differently, lamps shine “through” render layers. That makes some things easier, but other things harder, like controlling the shadows. Therefore Brecht has implemented a new feature, which lets you exclude certain objects from a render layer.
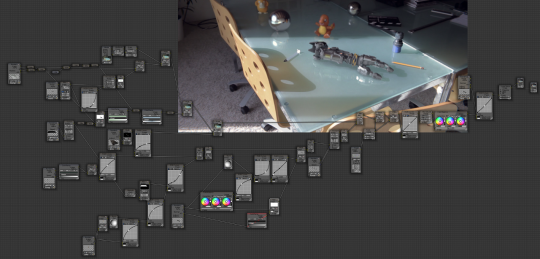
This gave us the control to have the little dragon cast a shadow onto the table, but also receive a shadow from a fake shadow-caster, but without that shadow-caster affecting the shadow-catcher (the table plane). With Blender’s compositing nodes we subtracted the actual shadow on the table from the fake one by using a Luma Matte.
But still, because of the camera motion and the motion blur, which results in some imperfections in the track, the trick with the shadow doesn’t really work in every frame. At some points you can see double-shadows, which totally gives it away. So, lesson learned: If possible, avoid CG objects being partly in real shadow and in CG shadow!
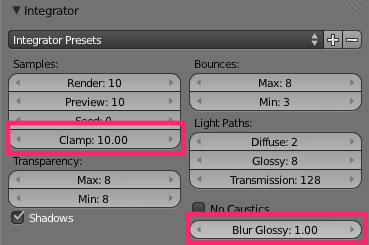
Another thing that we realized was that Cycles sometimes problems with glossy samples at glancing angles, which lead to noise that doesn’t go away even with 1000 samples. But having Brecht at the institute it was just a matter of one hour or so until we had a fix for that: blurring glossy rays that hit sharp highlights. I don’t really understand how exactly it works internally, but: it works!
Setting glossy blur to 1 helps to get rid of noise without any significant loss in quality. Also, clamping overly bright areas helps to get rid of fireflies. So we could reduce render time from almost 1 hour per frame to a few minutes. :)
So a big thanks to Brecht and Sergey for being awesome!


Image Magick has the ability to convert between formats, including Canon’s CR2 and OpenEXR. See: http://www.imagemagick.org/script/formats.php
Needs to be the hdri version for writing EXR. Simple as convert whatever.CR2 to whatever.exr on the CLI, batch processing should be easy enough.
Might need to set -depth & -colorspace although both are linear formats.
Also if you run into memory issues add these with your own suitable values.
-limit memory 500MiB -limit map 1GiB
There’s a bit of info here possibly:
http://blendervse.wordpress.com/2011/09/16/8bit-video-to-16bit-scene-referred-linear-exrs/
complex process :/
“If possible, avoid CG objects being partly in real shadow and in CG shadow” Yup! Also learned that two days ago :)
I am in envy of all the really cool stuff going on at the blender institute these days. It blows my mind.
I think some bump mapping and “dirt”/scratches/dents etc… will help push the final version of the robot hand over the top. It looks very “perfect” now.
I was looking at some concept art for a pixar shorts in the bookstore the other day and John Lasseter’s modeling sheet for the telephone pole in “Birds on a wire” had notes all over saying “not regularly spaced” or “not perfectly round” to remind the modelers that real things aren’t.
That said, I am thoroughly impressed with your work, and I thank you for posting. I get more excited for the final version of the movie (and the whirlwind of activity that will happen when filming starts).
Great post very interesting!
Thanks Brecht and Sergey.
WOW Great Work
Instead of Apature you could use Darktable this is a very god Raw Converter.
Why did you not use a wide angle lens and take a HDR panorama that you stich with with Hugin, its advantage is that you have a perfect 360° enviroment map and not a distorted and only half one like the mirrorbal method.
Thanks a lot for the suggestion. Seems very useful and works good!
Well done Brecht and Sergey, and the rest of the team so far!
Robot hand looks amazingly real!!
ok, first of all “hand is fake” is obvious because you know you put it there ;) (obviously!) – for me, it was because I read it in the title.
I have to admit that, during the whole 9 seconds I’ve tried to figure it out if the other objects on the table are real or not!
Great work, I couldn’t tell the other items were fake as well. But now that I know they are I noticed one thing that is different from the physical objects.
You’ll notice that the duck toy, even though it’s in the shadow, is still casting a slight shadow on the table behind it. Same with the physical metal ball. The CG objects in the shadow do have some kind of AO or something, but are lacking the nice blurry shadow from the indirect light of the window.
Keep up the great work!
for RAWs: rawtherapee
for HDR: luminance (former qtpfsgui)
both open source (?)
sorry – mixed up EXR and HDR … I thought you want to convert bracketed CR2s to HDR
The guy reflecting on the ball doesn’t move :).
I know Luminance HDR can do CR2 to EXR conversion.
But in my experience it doesn’t seem to be a straight conversion. I think the EXR it outputs is a tonemapped version, which sometimes clamp some value information and doesn’t match the look in other software like RawTherapee(which can not write a EXR file)
And nice to see the glossy blur feature. I think it work like the reflection blur feature of MIA material in mentalRay? This would be really handy.
Glossy Blur (maybe not a great name, still time to change it before it goes to trunk) is not like reflection blur in Mental Ray I think, that would be roughness on the Glossy BSDF.
It’s a trick to avoid noise. I know some studios are doing something similar, but not if they do it the same way or if/how it is available in other render engines. There’s a more detailed explanation here:
http://wiki.blender.org/index.php/Doc:2.6/Manual/Render/Cycles/Integrator#Tricks
Thanks Brecht, I am a fan of you!
wow it’s already documented!!
Thank you Brecht.
for these great information
Sorry I got the name wrong.
the feature I tried to mentioned in mental Ray is called interpolate reflection. it’s a different setting from glossiness. But after reading the document I’m not quite sure if it’s the same thing as the blur glossy.
You know, as some point, I am going to have to try some other software so that I can gain perspective. The problem is that every time I consider doing it, Blender changes again and there’s no need. One of these days I’m simply going to have to blame Brecht for stifling my creative development. :-)
Thanks, as always, Brecht. Great job and thanks for keeping us hooked on Blender.
You should also think about using gray ball to match lighting on diffuse only. It can help to setup spec, bump and so on… before bringing up colors and textures. It’s easier to match lighting on gray first.
http://www.hdrlabs.com/tutorials/index.html#What_is_the_use_of_the_gray_bal
http://www.hdrlabs.com/cgi-bin/forum/YaBB.pl?num=1264525246
Sebastian-
I’m mostly an idiot when it comes to getting shadows out of cycles- do you think you could post a high-res link to that node setup? That would be the bomb.
Ahhhh… what must it be like to be a Blender Superstar? The rest of us can only dream! Looks like you all are having “fun”!
I would love to see the node setup and even the .blend file if at all possible.
I think it is cery sucessful and totally sells the illusion. Very convincing. The only thing giving it away is definitely the robot hand and only because it is out of context.
You’ve never seen a robot hand laying on a table like that? Looks perfectly normal to me. :D
Please ! the node setup for the shadow catcher, i’ve trying to get my head around making one for days, with no luck!….
ppreeetty pleeasee!
yeah, me too. Starting to feel ‘very inadequate’ in my Blender skills
Charmander is a flame pokémon and not a dragon pokémon.
As someone who knows very little about CG it’s fascinating reading these updates and seeing things as you’re working through them. So complicated…
The only thought of these assets animated and in context makes me drool.
It might seem obvious, but dcraw (http://www.cybercom.net/~dcoffin/dcraw/) seems to be the best solution for RAW processing. It can output linear 16-bit (s)RGB to a TIFF file, which can easily be converted to an EXR.
Also-
I’ve been doing some pano creation recently and really can’t tell much of a difference (in Blender) between an EXR file and an HDR file. I know EXR can handle an alpha channel, but I have yet to see that utilized in Blender. And I know that EXR has greater color fidelity, so one would think that it should….look better?
This was bugging me. I rendered out a HDR and an EXR 360 panorama at low res (3000px by 1500px (10+ exposure levels for the pano, so decent dynamic range b/n -4 ev and 4ev.)) Then I chucked it into Cycles and rendered one scene with the HDR and the other with the EXR. Here was the result: http://www.pasteall.org/pic/
To be honest, I can’t tell much of a difference. I even split one in half in photoshop and laid it on top of the other. I toggled it off an on and there was no indication that these two were different. Other than file size and render time. (the EXR was a slightly larger file and slightly longer)
My question to the team is: 1) is there a conscious choice to use EXR over HDR? and 2) will there be a situation (do you think) during Mango when you would actually need the alpha channel that EXR provides?
Sorry for the long lead in- but this has been driving me nuts for a while. Thought someone might take it up?
The image URL you posted was incomplete!
Crap. Sorry. Here’s the comparison:
http://www.pasteall.org/pic/30466
And the original pics:
rendered with exr: http://www.pasteall.org/pic/30467
rendered with hdr: http://www.pasteall.org/pic/30468
It might look like there is a difference in color between the two, but when you compare them in Photoshop (delete half of one while it is layered on top of the other)- I can’t tell a difference.
I’m beginning to think I’m slightly colorblind! Or my workflow is off. Might have to move this to blenderartists, but wanted to see if the team had a quick answer
The main thing EXR has over HDR is that it has multilayer support, and that it’s basically well integrated into the render pipeline in Blender already.
But converting between HDR and EXR should be no problem. The difficulty is converting from RAW files, since those are camera specific and need to be ‘baked down’ to a format like EXR/HDR/TIFF.
Thanks for taking the time Brecht. The clarification is great. I’ll start rendering my panos to HDR instead.
I’ve got some more tests to run, but I’m also getting to the point of realizing that (at least in terms of Blender), I might not need to be taking 10+ levels of exposure when I’m making panos. If you all are using RAW images, that should work fine for most situations.
EXR, that is.
Also regarding fidelity, HDR is indeed compressed more than a typical EXR. In practice for environment maps it might not make much difference, but there’s no reason for us to use a different file format if EXR works ok and is used in other places in the render pipeline.
That wouldn’t be the new tile compositor by any chance? ;-)
Wow looks great! However my brother immediately noticed that the mirror ball was fake because he could not see the reflection of the camera man!
Also not apparent in this shot but here: /wp-content/uploads/2012/04/robot_hand_integration.jpg you can see that the reflection of the hand does not block the reflection of the vase. Instead it blends with it. CG reflections should be opaque not transparent.
Looking good.
I guess getting the real shadows right will be a pain.
Even in starwars the shadows flip on and of per shot.
Maybe film everything without shadows and cg them all in.
Is there going to be a download for these new features? I’d find them very useful.
Amazing video, hand job done perfectly. I’m waiting for the whole movie.
please please the node setup for the SHADOW CATCHER just that is all i ask for :)