Textures .. there’s never enough of them (especially tileable , equalized , easily reusable ones)
While modelling stuff for the dome i’ve been doing some tileable textures kits, still lots to model, but some assets already need to be tested with materials to define the pipeline (.. or simply to check if modelled detail is enough :D)

These textures are work in progress ( the finished version will go in the final dvd) they are mostly based on photos i or Sebastian took around the city or from Campbell Barton’s library.( http://www.graphicall.org/ftp/ideasman42/textures/ )
The process of making photos into reusable textures is relatively simple , involving cropping, undistorting and clone-stamping over edges to eliminate seams.
Then the interesting part is the ‘equalization’ that is removing ‘big shapes’ and gradients that will make the tiling too visible.
For doing that Gimp has a great ‘wavelet decompose’ plugin (available from plugin repository) : it will break the image into several layers each containing a ‘scale’ of detail from the smaller to the biggest … then you can just delete the bigger scale layers (usually , on a 2-4k texture details bigger than 300-400 pixels only ruin the usefullness of the texture as a tileable)
There’s more to say but .. there will be a quick video tutorial about this.
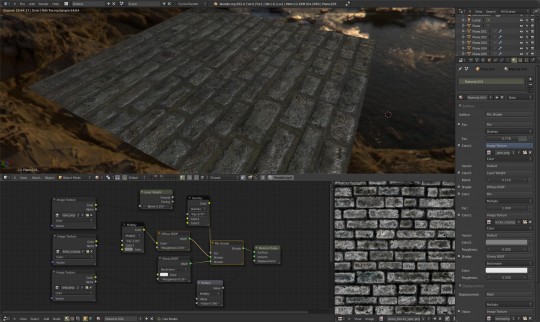
For the shader : it’s a simple cycles nodes setup as you see in the picture . More polished kits (mesh+textures+materials) coming soon.
So, for now enjoy the free CC licensed textures preview :
https://download.blender.org/mango/Tests/wip-textures/
CC licensing info : You are free: – to copy, distribute and display the work – to make derivative works – to make commercial use of the work
Under the following conditions: You must attribute the work as: (C) Blender Foundation – mango.blender.org


ooooh… thanks :)
Nice, it seems like I wasn’t the only one to invent this. :P
You can also do it manually in GIMP (maybe you can write a script for it?) more succintly by following these steps:
1) Duplicate to a new image layer
2) Gaussian blur it to the amount of “low frequency content” you want to remove (say, 1/3rd of your image width)
3) Set the layer to “Grain extract” blend mode
4) Done! Flatten the image.
This will also remove most of the color, so you might want to follow these additional steps:
3.5) Take the average color sample from the blurred layer
4) Flatten the image
5) Create a new layer filled with your sampled color
6) Set the layer to “Grain merge” blend mode
7) Done! Flatten the image.
I hope that is informative.
Hi,interesting, seems to be the same technique , with different steps.
The plugin (actually a script) it’s already there and its workflow works very well for me.( The fact that it breaks the image down into multiple layers)
http://registry.gimp.org/node/11742
I usually start from 2 pixels min., then 6x layers, each 4-6x the radius. Then generally keep layers 1-4 and discard the last 1-2.
The ‘residual’ bottom layer has the average color (indeed very useful, also to recolor a material completely)
I know this is all based on highpass and difference-of-gaussians, and variants are possible (i.e. the script puts the image back toghether by grain merge , not extract and each layer in itself is an highpass filter image ..so you can also use it to sharpen small details)
Edit : forgot link to script :)
Oh .. and if you don’t like the workflow with multiple layers and such , there’s another script specifically for texturing :
http://registry.gimp.org/node/24636
I prefer the control given by the 1st script (run once then decide, instead of re-running it to try different radiuses), but this is nice too.
Hey Ni:Zu,
for a project I have created a blender nodesetup which filters any image input into a displacement map. It’s a simple blendfile and works very well and the displacement maps created are usually working without spikes without any further refinement: http://download.creamsurfer.de/blender/displacer-sample.jpg
I have uploaded it (in case you may want to have a look – may come in handy): http://download.creamsurfer.de/blender/displacer.blend
Manuel
I guess my comment from yesterday is still awaiting moderation. Maybe because I put two links in there for a probably useful displacement map generator file. Just in case else my comment is lost – but not rush… I know you are all busy ;)
Manuel
Ooh nice, thanks!
I wasn’t checking pending comments , good thing you pointed it out.
That’s definitely interesting , just today we’ve been on location at the Oude Kerk and i took some pictures of bas-reliefs with flash and w/o … that would be a perfect test ..
Hi, what is the theme you are using? If it’s custom, could you share?
Hi,
Yes of course :
http://www.pasteall.org/31313/xml
Save as XML into Blender’s themes folder :
.blender/2.63/scripts/presets/interface_theme/
Credit goes to the author of Blender zbrush-like theme , this is just a slightly modified version.
This theme was asked before ..sorry but -of course- Mango is keeping me crazy busy.. i never had the time to check if it can go into trunk or whatever ..so i put it into pasteall by now.
Thanks!
Krita actually has an interesting GSoC project running at the moment, to add a “wraparound” mode where scrolling and painting / cloning wraps when going over one of the canvas edges, so you never get seams from painting in tileable textures. Also great for touching up seams in existing photos.
Interesting!
The offset layer tool in Gimp does the job , but can get messy , an actual wrap-around for every paintstroke or filter ? that’d be really smart.
Btw , i’m using Gimp 2.7 (because of its filters , and dynamic brushes) , and the rest of the team has been using Gimp or Krita , now that 2.8 is out, i’m curious to see how popular it will be (2.7 needing compiling for linux meant not all machines had it and other issues) .