Hi! Today I prepared a few tips about masking, I hope they will be useful for you.
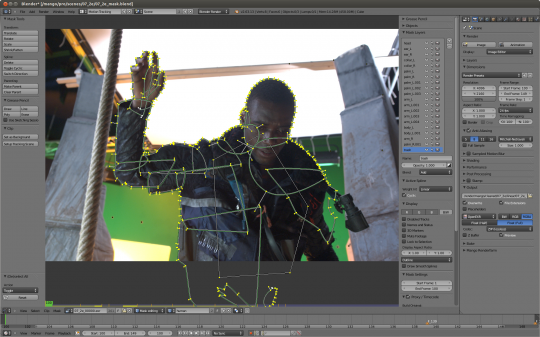
1. Analyze the sequence. Try to figure out which parts of the object are overlapping, moves in different directions (arms, legs, body of walking man; protruding elements and body of a car (eg: mirrors, antenas, lights on the roof); ears and nose when head turns). For each of those overlapped objects you should create separate mask. Obvious masks also should be overlapped, not end-to-end (only just touching).
Its a good idea is to create separate masks for parts with different kinds of motion. For example, if a man stays still and shakes his head actively, you can create separate masks for head and figure. But someone moves across the screen in a straight line and hold his head straight, you’ll need separate masks for arms and legs, and you can create single mask for head and body.
It’s important to create masks namely for objects, not for spaces between them.
For example, if a man is waving a flag held with both hands – Then the overall shape the hands, body and flagstaff would be much more consistent and easy for masking, than it would be if the whole body’s silhouette and spaces between arms and body.
Never try masking out a group of moving people with a single mask. The same thing applies for clenching fist. In this case you should use separate masks for each knuckle.
Also for complex shapes, use several masks with just one “working” side (see below)
2. Always use tracking where possible. If the shape of the object changing slightly, and you have translating, rotation or zoom in the sequence, you can track the motion and attach mask vertices’s to the track. In this way you’ll get general motion and you’ll need create much less keyframes for compensate inaccuracy of tracking.
3. Find the frame where you can see whole object. Start masking from this frame. Try to use as few mask points as possible for the objects outline. Otherwise it could be hard to animate.
Next, to avoid jittering and sudden movements of mask, animate the mask in several passes. Firstly create basic keyframes and then add keyframes where its necessary.
4. First pass. Find the key moments – beginning of objects moving, stopping, changing speed. Create certain amount of keyframes accordingly.
While animating a mask its easy to forget the origins of the mask points – so for eg: what starts as the point of an elbow may end on the wrist by the end of the animation. – This should be avoided because the areas in-between the keyframes tend to look bad and you end up adding more keyframes to compensate for it.
5. Second pass. Check how mask interpolates between keyframes and how it follows the movement of object. Add keyframes where the mask has the most significant offset from the object. Repeat this 3 or four times.
Once you have the bare minimum number of keyframes needed, the masks animation will look smooth so you’ll be able to adjust mask’s shape with less effort.
Now you can enable motion blur on the mask node, adjusting individually for each shot. In Blender I usually use Shutter = 0.25-0.35.
One more time – less points, less keyframes as you can!
Big thanks to Alexey Shavrov and Campbell Barton for help with this post.


I always wondered if you guys has learned this techniques in the movie industry with another proprietary software and the applied it to blender, or has you done this the first time in blender???
I learned it while I worked in movie industry. I use this method in Nuke, Fusion, etc, and its works perfect with Blender also.
I was wondering the same thing. I looks like quite a steep learning curve!
Thanks!
It looks like you feather to the objects edge instead of doing the outline on the exact edge, is this correct?
Yes, exactly. It helps a lot especially when you have huge motion blur. But when I did this shot (7_2e) we didn’t have motion blur for masks.
Clueless vfx noob question here. What exactly is masking used for? Is it just for limiting the area that the composite nodes have to calculate for, or is it actually an extraction tool in its own right? Or do I have completely the wrong idea?
I’ve been lurking around the blog since it got started, and I’ve learned a lot and had fun reading it. I can’t wait to see the final product of all of your hard work. The stuff that’s been put up here looks stunning.
Masking can be used for many things. On Mango its mostly used for Matte creation. A matte is a greyscale image that defines the areas of your plate that you want transparent. Whatever is white will remain, and the black will become transparent. So you can isolate an actor from their background and insert them somewhere else. Masking also can aid green screen keying. Masks can also isolate parts of the image for say, color correction.
Payotn
Thank you to everyone who answered my question. I have a couple more now, since questions breed like rabbits, but I’ll try to make these the last ones.
Other than removing tracking markers, why would one use masking to aid green screening?
Also, in the image, the head of the character is clearly not over a green screen. Here it is relatively easy to mask out, due to the character’s hair cut, but with a character with longer hair and messier hair, how would one mask in an efficient manner and preserve the hair, particularly if the background was more complex than the somewhat even, blank surface behind the character in the image here, preventing matte nodes from being employed effectively?
Sorry. Something of a run-on sentence. Thanks in advance.
A couple of weeks ago, there was a post showing how the mattes where made for one of the scientists. A lot of tweaking indeed goes into the hair!
In simple terms, masking basically creates a cutout in the frame. So lets say you have a figure walking across screen and you want to show him walking in front of a space port (which you’ve already created a plate for in Blender). But you didn’t actually shoot the figure walking in front of a green screen.
Well, to accomplish this, you’d have to somehow cut the figure out of the clip so that way you could put in your plate and it would look like the figure was in front of the plate, not behind it. This is what masking does. You isolate the figure and turn anything other than the portions you’ve isolated into Alpha. Now you have a figure walking across alpha, which is much more usable for compositing.
There are other kinds of masking too (technically, you could make the figure alpha instead of the background), but not as common.
Object Removal from Videos of Crowded Scenes
New technique from Sigraph 2012
http://www.youtube.com/watch?v=j3uCV0JYMJ4
Wow. Amazing looking video. It just boggles my mind how they’re able to get such natural looking video with so much stuff occluded…
First question from VFX supe should have been “Why did’nt you fly a handheld green screen into this shot?!”
Great break down of masking. I just did it the dumb way and all those bad things happened. Going to go back and make my mask modular now! Thanks.
The answer is simple – because there was not enough time. As always.
I have just tried this method out and it is soooo much better for minimising the migtration of verts around the mask shape.
But I have one observation.
Is there a way to solo the mask shape that you are currently working on?
That is hide all except for the active mask shape.
I have found that the overlapping masks can get hard to discriminate between. To many verts near each other means you often select the wrong one or the wrong linked mask.
I know you can hide masks by poking the eye in the mask meu but that is a very slow way to wrk when you are editing a mask shape over time in a fast fluid manner.
Sorry all, I see that Shift H is hide all non-selected. Essentially a solo of the currently selected item.
So thanks for fixing that before I asked for it ;)