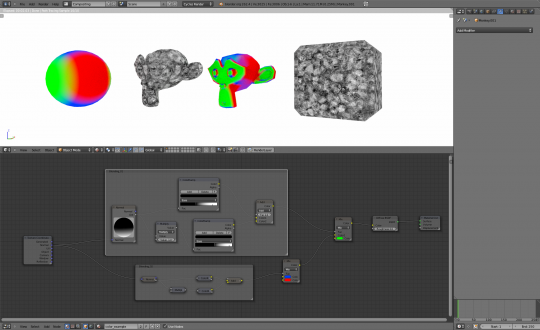
Blended box mapping is a technique where you project images from 3 angles and blend them together based on the objects normals. Doing this in cycles was until recently only possible to do on static objects, but now we can use it on animated objects as well!
Download example file: blended_box_map
This technique requires a very new build of blender after build revision 46076. That means newer then blender 2.63 stable. Or you can also use a recent tomato branch
Hope you guys find it useful
If you want to geek out and learn more about this technique then go here:
http://www.neilblevins.com/cg_education/blended_box_mapping/blended_box_mapping.htm


Hi,
I have downloaded the test file, it gives me a very much different result. Basically, it is not working.
http://dl.dropbox.com/u/2101059/test.jpg
I am using the official version.
Should I download a new version from graphicall?
crap.. you might need a never version of blender. one of the features that makes this possible was made during feature freeze, so it’s not included in current stable version of blender.
allright. i’ve investigated this and it seems like brecht did a small mistake when merging. ktysdal: it seems i forgot to merge one file, will commit a fix to trunk now”
from irc: “
it should be fixed in very near future :)
Thank you for your time :)
Thx for great blog post very interesting!
Any news about mapping by other object position/decals? This option was available in Internal and there is no todo about that.
“Any news about mapping by other object position/decals?”
sorry, no. but knowing Brecht i’m guessing it’s fairly easy for him to implement. it’s just a matter of time and priority
Hey! Thats what i searched a long time Ago. Now i know its called Boxmapping.
Thanks! This is great.
hmm I cant figure it out…
why there are tree image nodes why I cant use one image node and connect it to all projections?
The projection is tied to the image node. So to get 3 projections you currently need 3 image nodes. But yeah, i agree. Getting this to work with only one image node would be easier and probably more resource friendly. Maybe Brecht can take a look at it after all the high priority stuff is done
As for the image texture, you can *group* the Image Texture node by itself and reuse it in every node tree. That way if you want to change the image you only need to change the group, and everything else updates. This is also helpful if you want to rotate/scale/move the image around a bit, as it will update for all projections.
Long time fan of Blevins, have tried many times to figure out how to apply this concept in Blender. How exciting!
Is Brecht there in the Blender Institute with you all?
Yeah. This week he is at the institute.
Hey took this idea and made two of my own versions of it, would you be interested in seeing them?
sure. if you can show pictures and/or blend then that would be fun to see
Here is the blend file.
http://www.pasteall.org/blend/13688
For some reason the image wouldn’t pack correctly, so you might have to replace it to be able to see the textured version.
i took a look at the file. You have considerably more math stuff then what i used. Very nice.
One thing that i noticed was that you used geometry/normal as a base for all this. the problem with that is that it is world space, so it doesn’t work with animated objects. if you grab a brand new blender build and then try using texture coordinate/normal instead then you will get normals in object space that will follow the object in animation.
Thanks for sharing
Very cool stuff! Is there a way to manually input the position of the Normal Node? Or is eyeballing our only option for now?
Extremely useful node setup. I would like to see a single node instead of this macaroni. Thank you
We’re facing a problem though.
1. If defuse map is combined with bump. It won’t work, unexpected. Artifacts around.
2. As diffuse only, it works, seamlessly, when smooth shader is on.
3. Smooth shader works with normal texturing but is automatically disabled when ‘true normal’ is in use.
4. If diffuse+bump is in use, true normal is the only solution.
Conclusions: True normal instead of normal! But why smooth shading isn’t working then?
When you have a tall and thin object?
Texture stretching, it seems that this setup works on cube like surrounded meshes.
Well, I added textures coordinates and fixed it.
hi michalis. the setup in the example file that i uploaded could be improved alot. the texture coordinate node that feeds into the image nodes is in the file set to use Generated. If you set it to Object it should fix the problem with the stretching.
Great tip thanks for posting!
I was trying to use this to act as the factor for a mixed shader but BSDF output does not appear to work for this.
Editing the Node Group to return a color output as well as BSDF got round this.
I still have an issue, as part of my spaceship model I created an array of hemispheres, but they each have the exact same shading no matter if I apply the array modifier, merge them with the rest of the model, or change the mapping scale of the image. Is there any way to fix this?