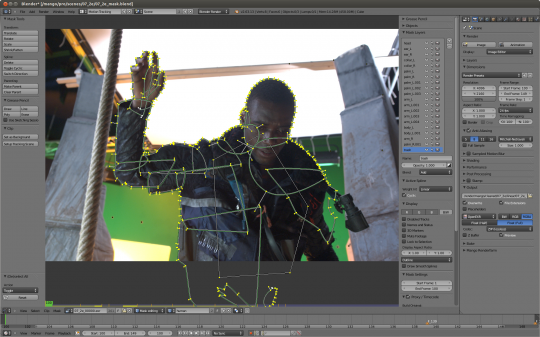
Hi! Today I prepared a few tips about masking, I hope they will be useful for you.
1. Analyze the sequence. Try to figure out which parts of the object are overlapping, moves in different directions (arms, legs, body of walking man; protruding elements and body of a car (eg: mirrors, antenas, lights on the roof); ears and nose when head turns). For each of those overlapped objects you should create separate mask. Obvious masks also should be overlapped, not end-to-end (only just touching).
Its a good idea is to create separate masks for parts with different kinds of motion. For example, if a man stays still and shakes his head actively, you can create separate masks for head and figure. But someone moves across the screen in a straight line and hold his head straight, you’ll need separate masks for arms and legs, and you can create single mask for head and body.
It’s important to create masks namely for objects, not for spaces between them.
For example, if a man is waving a flag held with both hands – Then the overall shape the hands, body and flagstaff would be much more consistent and easy for masking, than it would be if the whole body’s silhouette and spaces between arms and body.
Never try masking out a group of moving people with a single mask. The same thing applies for clenching fist. In this case you should use separate masks for each knuckle.
Also for complex shapes, use several masks with just one “working” side (see below)
2. Always use tracking where possible. If the shape of the object changing slightly, and you have translating, rotation or zoom in the sequence, you can track the motion and attach mask vertices’s to the track. In this way you’ll get general motion and you’ll need create much less keyframes for compensate inaccuracy of tracking.
3. Find the frame where you can see whole object. Start masking from this frame. Try to use as few mask points as possible for the objects outline. Otherwise it could be hard to animate.
Next, to avoid jittering and sudden movements of mask, animate the mask in several passes. Firstly create basic keyframes and then add keyframes where its necessary.
4. First pass. Find the key moments – beginning of objects moving, stopping, changing speed. Create certain amount of keyframes accordingly.
While animating a mask its easy to forget the origins of the mask points – so for eg: what starts as the point of an elbow may end on the wrist by the end of the animation. – This should be avoided because the areas in-between the keyframes tend to look bad and you end up adding more keyframes to compensate for it.
5. Second pass. Check how mask interpolates between keyframes and how it follows the movement of object. Add keyframes where the mask has the most significant offset from the object. Repeat this 3 or four times.
Once you have the bare minimum number of keyframes needed, the masks animation will look smooth so you’ll be able to adjust mask’s shape with less effort.
Now you can enable motion blur on the mask node, adjusting individually for each shot. In Blender I usually use Shutter = 0.25-0.35.
One more time – less points, less keyframes as you can!
Big thanks to Alexey Shavrov and Campbell Barton for help with this post.


