
Here are the tips and rules I set for my storyboard workflow on the Mango project. For the past project Sintel, I decided to make it on traditional ( each frame drawed on paper ), but as the tools get betters 3 years after, I decided to go with digital storyboarding for this new project. I used Krita 2.4 ( last version, compiled from fresh sources ) as my main tool. Krita’s features presented here are really recent for some and were done on purpose to boost this workflow. But lets starts for now with the spec I use :
1. Image Resolution, size, format and compression:

I decided to use this 2432×1024 weird format a bit arbitrary to keep the frame compatible with Mypaint ( who round each picture at saving to 64px , a known bug rooted in Mypaint engine ). Of course this size is a little ‘ off ‘ compare to the 2.39:1 ratio cinema standard, but for a storyboard it’s ok. PNG file format is used for the easy compatibility with other systems ; I want the team to be able to use the frame with any picture viewer and openraster ( *.ora , multilayer opensource file format ) still don’t allow it yet. The choice of having a large size over 2000px was lead to can reuse the brush preset I’ve done ; mostly are designed to render good strokes on the scaling of a A4 300 ppi ( 2480 x 3508 px ) , at around 35% zoom out of the viewport from the real pixel size.
2. Background and style

I start often on a bright grey background ( select the grey tones on a palette, then ‘X’ on keyboard to switcfh the foreground color with background color , then ‘Backspace’ to fill the background with the background color. ).

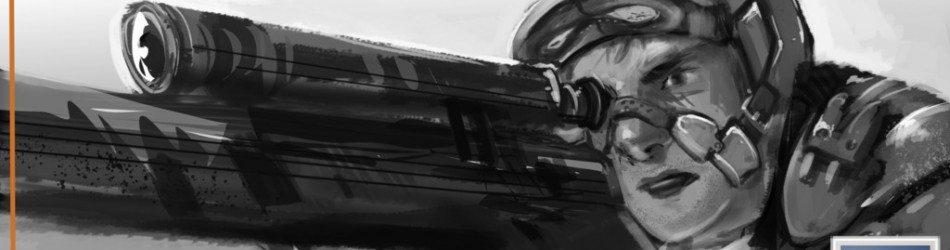
For the style, I draw greyscale silhouettes; with minimalistic outliner in a first draf step. Silhouettes are great to focus on the composition, and I generaly use the following code : Darker shape are in front of the camera, lighter grey are back. Black and White zone with contrast attract the eyes , I use it to underline the focus point of the picture.

If the shot get validated I can work it a bit more and render some details on the top. But this step is only useful when a shot also need to preview concept art in a precise situation of a shot.
This is already on the previsualisation , than really storyboarding. But because it produce nice looking picture and makes the story able to be read as a comics , I like to render my frame like that. I hope I will get time to make the definitive version like this.
3. Krita ‘save incremental’ workflow ( or the magic F2 key )

Krita can work fast on storyboard, if you name your first file with this sort of pattern :
xxxx_001.png
Then you can use ‘backspace’ to erase the whole picture ( I work flat on this little pictures ) , draw another frame , then press ‘F2’ on keyboard as a shortcut for File > Save incremental version.
Your files will be saved like this :
xxxx_001.png
xxxx_002.png
xxxx_003.png
etc…

So , it’s easy to be fast to draw a scene in a linear way , just frames after frames. If you have a picture viewer open in parallel who read the sequence according to filenaming ( I use Gwenview who does excellent dynamic fading transition between frame on the fly, part of every KDE distributions , here I use Linux Mint KDE 12 ).
4. Inserting new frames before or after

You can take advantage of working with the filenaming as a ‘timeline’ if you want to insert a frame before or after another one.
For exemple , in the list xxxx_001.png , xxxx_002.png , xxxx_003.png , it’s easy to add a frame before and after 002 like this :
xxxx_001.png
> xxxx_001b.png
xxxx_002.png
> xxxx_002b.png
xxxx_003.png
Working with extra letters ( + a~z ) offer 26 more ‘slot’ before and after a frame.
5. Modifying a frame , using an existing frame

From your file browser ( mine is Dolphin , the file browser in KDE ) you can drag and drop the file over Krita (1) ; a nice menu will appear (2) and propose you to “replace the current document” ( ideal to re-work a frame without closing Krita ) , or “Insert as layer” ( this is cool if you want to insert an element from the previous frame , it happens a lot of time ).
6. Cleaning

Of course , a series of filename like 001, 001b, 002, 002b, 002c, 003 … etc… might not be clean for the final file sharing. I use the rename utiliy in the Gthumb picture viewer ( select thumbnails in diapo mode, then hit ‘F2’ ). This renamer dialog is able to patternize and rename all the files in a cleaner way. So don’t be affraid to work a bit messy ; if your file order by filename is OK , then you can always clean it at the end. Optionally , you can also batch rename in Dolphin ( the default filebrowser of Kde ) directly with F2 or with a right click and ‘rename’ label , the pattern options are mutch more basics, but it does also the job for a simple batch renaming.
When all the *.png frames are ready , you can insert them with Libre Office Draw in page and write subtitles or annotations and draw vector arrow above. Libre Office Draw is fine to work in multipage document, then print it or do a Pdf out of it. Ian did it for a dossier last Friday.
For animatic storyboard, Png frames are easy to embed into the time line of a video editor ; Blender VSE or Kdenlive. But we are still not at this step of the process to talk about it more.
Conclusion
Thats all, I hope this informations will help you to improve your “digital storyboard workflow” when you will need it. Now I have to go back and draw more of concept art.
Today : Robots again ! I will try to answer any comments related to questions about this process.
– Note : Thanks to the Krita team, and particularly Boudewijn Rempt, Dmitry Kazakov and Sven Langkamp for the fix, helps and new features for Mango.
– Note 2: Krita team is looking for coder(s) to fix OpenEXR support in 2.4. It will be a needed tool for Mango artist.
Article license infos :
CC-By Blender Foundation : www.blender.org :: artwork : David Revoy

Thanks for giving an insight on your workflow. Now if only I could draw like you can *grin*
Idem!
Would this workflow also be feasible for feature film with 1500 shots?
I guess yes ; but it would be easier to work with folders based on scene name to avoid to big folders of *.png frames and file pattern like sc114_1215.png
What’s actually the most common workflow for digital storyboarding, David?
Software like After Effects, or Tvpaint ; who can do video & painting with a real timeline are great for Storyboarding ; you can insert frame on the timeline and move your block , control timing , as a video block.
Maybe in open sources, the software the most able to reach this is Blender Video Sequence Editor , with the addition of a feature able to ‘Add’ a Image/UV blocks and paint/save this image on the fly internally… With better paint tools in Blender it could works :)
David, you can also rename the images in dolphin… Just select them all and press f2. Than you can type a name like:
something##
The #’s are the amount of numbers you want to use…
Oh sorry I didn’t read xD
No problem :) Here I use Gthumb because I also need more complex pattern from time to time. But sure, Dolphin is great for this.
that little nugget just made my day.
KRename is also good for more complex patterns
Excellent! I’ve done the storyboard and animatic for my animation recently and I would have loved to see this post before diving into that! Storyboarding is so much fun isn’ it? and I completely agree with you David, it’s almost a sort of “comic book stage” of the production process.
j’ai adore ce post
Thanks Luis Felipe !
just great like and useful like any other of the share you did before again thank you David!
I realy hope be able one days do awesome art like you !
Keep training and I’m sure you’ll be able . Thanks for the comment
Hey.
A Storyboard is for yourself, so only you know how you want to do it, and what helps you. But if it is going to have a 16:9 ratio, it helps to storyboard it in a 16:9. Cause for different ratios there are different shots and angles that look better. You should try and visualise it in 16:9 and see if the same shot works. I mean, they’re not that different, so I bet they do work, but sometimes it works differently.
Also, Really cool work! I’m looking forward to seeing this.
Is really looking impressive David! thanks for sharing. Looking forward to see more of your workflow in the Mango project
Hey, nice post on opensource. I never herad of that before. Thanks. Bye, Kornelia.